

What is Euro Nymphing?
Euro style nymphing is a style of fly fishing that that can be generally characterized as using heavy weighted flies attached to long leaders, with the purpose of maintaining a tight line, enabling constant contact with fly and naturally drifting it through fast currents. There are multiple variations to this, but this serves as general characterization of a form of fly fishing that has changed the nature of competitive fly fishing since its debut. That debut happened on when the Polish team out-fished their East German and Czechoslovakian counterparts on the Dunajec river in 1984 despite not having the most sophisticated equipment. What they did have was physics on their side.
Short and tight lines that eliminated drag for a natural presentation
A heavy fly that, being heavy, fell very quickly to the bottom where fish reside
A direct connection to their flies allowing for great sensitivity in detecting strikes
The rest is history. The Poles taught the technique to the Czechoslovakian team which went on to achieve even more success using it, hence the term “Czech Nymphing” which is used interchangeably with the term Euro style nymphing. In truth, other European nations have developed their own variations of the technique. The Spanish and French, in particular, have achieved great success with their variations. (since 1981, when the annual fly fishing world championships started, the Czech team has won 10 tournaments, while the French have won 9 and the Spanish 3.)
Euro Style Nymphing with Keiryu?
ABSOLUTELY. While the term Euro Nymphing is associated with Western gear, the fact is, Keiryu rods excel at Euro style nymphing. This is due to three main factors:
Keiryu rods are designed to use light, thin lines that allow you to get your nymph to the bottom quickly.
There is virtually no slack or interference between you and your nymph.
The Keiryu rods are fast action rods, with flexible tips that allow the fish to take the nymph (and also act as sensitive indicators of a strike), and strong backbones which allow you to set the hook successfully.
The result is the ability to drift through fast water with a vertical, no drag, connection to your fly, along with the sensitivity to feel the take and then set the hook.
Make Your Own Nymphing / Subsurface Fishing Lines
One of the great things about Keiryu Fixed Line fishing is the ability to make excellent lines with existing materials. This section covers options for making nymphing / subsurface lines and will be CONTINUOSLY UPDATED as we learn and get more experience. If you prefer, you can also buy our Euro Nymph Line.
Three Line Options
Lines made for approx 18 ft. rod and can be increased/decreased to meet your needs.
REMEMBER: These lines are meant to be cast using a LOB or ORBIT cast.
FINESSE TIPPET LINE
This is an ultra light, thin line. We start with braid at top which helps with line tracking. The lines then transitions to tippet, tappering from a larger size to the final tippet section. Indicator line or yarn can be added to help traction and detect strikes. PLEASE NOTE: In the video , we used 50 lb. braid for girth hitch loop but now recommend 20 lb. fly line backing.

Girth Hitch Loop
Use Fly Line Backing Dacron 20 lb to make your girth hitch loop (we used 50 lb. braid in the video but like the backing more!)
Top Section - 4 ft.
For the top section of the line, we recommend a high visibility 15 lb braid line. Make a loop at end and attach to grith hitch loop via a loop to loop connection.
Main Line - 8 ft.
Use 5X-3X depending on the size of the final tippet section that you will tapper down to. Mono or Fluoro line can be used or regular 5-8 lb line instead of tippet line. Use se a quadruple (4 wraps) knot to attach to braid.
Indicator - 1 ft.
This is optional (not in video). Indicator line or yarn markers can help line traction & strike detection. Attach to main line with blood knot or surgeon’s knot.
Tippet - 4 ft.
Use Fluoro tippet, size 7X-4X. Where possible, size down, especially with finicky fish. Attach to indicator using blood knot or surgeon’s knot.
SPIDERWIRE PE BRAID
Spiderwire PE (polyethylene) braid is light, thin, strong, and does not stretch, aiding in successful strikes. While it does float, that does not affect its ability to be an excellent fixed line nymphing line. We have found 30 lb. braid to be the optimal size. This is an easy to make line.

Girth Hitch Loop
Use Fly Line Backing Dacron 20 lb to make your girth hitch loop.
Main Line - 12 ft.
Use 12-13 ft of Spiderwire 30 lb braid. Make a loop at end and attach to girth hitch loop via a loop to loop connection.
Indicator - 1 ft.
Use 3X indicator line. Attach to braid line using a triple surgeon’s knot. Optional: attach tippet ring (2mm) to end of indicator line.
Tippet - 4 ft.
Use Fluoro tippet, size 7X-4X. Where possible, size down, especially with finicky fish. Attach to indicator line using blood knot or surgeon’s knot or attach via tippet ring.
TENKARA LEVEL LINE 3.5
Tenkara level line is highly visibily and light. While it has some kink and memory to it, this aids in its ability to stay off the water (anti-droop), promoting execllent drifts.

Girth Hitch Loop
Use Fly Line Backing Dacron 20 lb to make your girth hitch loop.
Main Line - 12 ft.
Use 12-13 ft of Tenkara level line. Make a figure 8 stopper knot at end of line. To attach loop: wrap tag end of loop once around level line and then back through loop. Tighten against stopper knot. Super glue can be added for extra strength.
Indicator - 1 ft.
Use 3X indicator line. Attach to braid line using a blood knot or a slip knot. Optional: attach tippet ring (2mm) to end of indicator line.
Tippet - 4 ft.
Use Fluoro tippet, size 7X-4X. Where possible, size down, especially with finicky fish. Attach to indicator line using blood knot or surgeon’s knot or attach via tippet ring.
Nymphs To Use On Your Keiryu Euro Nymph Rig
There are numerous, almost endless options when it comes to choosing nymphs for your nymph rig. Below are some starting recommendations.

Balance Breadth vs. Depth
You can choose a single fly or an endless variety based matching water and hatch conditions. Most anglers fall in between and probably a bit closer to the former. Our recommendation is to build up a selection of flies that you are comfortable with. Consider it your starting line-up, say 5-8 fly patterns (for some of you this will be 3-5 and others, it will be 12-15). Now, do two things to your staring line-up:
Make sure you have depth. By depth, we mean weight / size variety for the fly patterns you have chosen. For example, we love the 20 Incher Jig Nymph as a bottom fly and often fish it in size 8 but we make sure to have it size 10 and 12 as well, pending water conditions (whereby smaller water, shallower water = smaller size).
Challenge your starting line-up. If you caught 2 fish with your starting line-up flies, give them a break and experiment with something new. See what the new guy can do. Maybe it can make it into the line-up, maybe not, but now you know.
The Bottom Fly
The bottom fly is the workhorse in the two (2) nymph Euro rig. It is resonsible for quickly getting the rig down into the strike zone. Some recommendations:
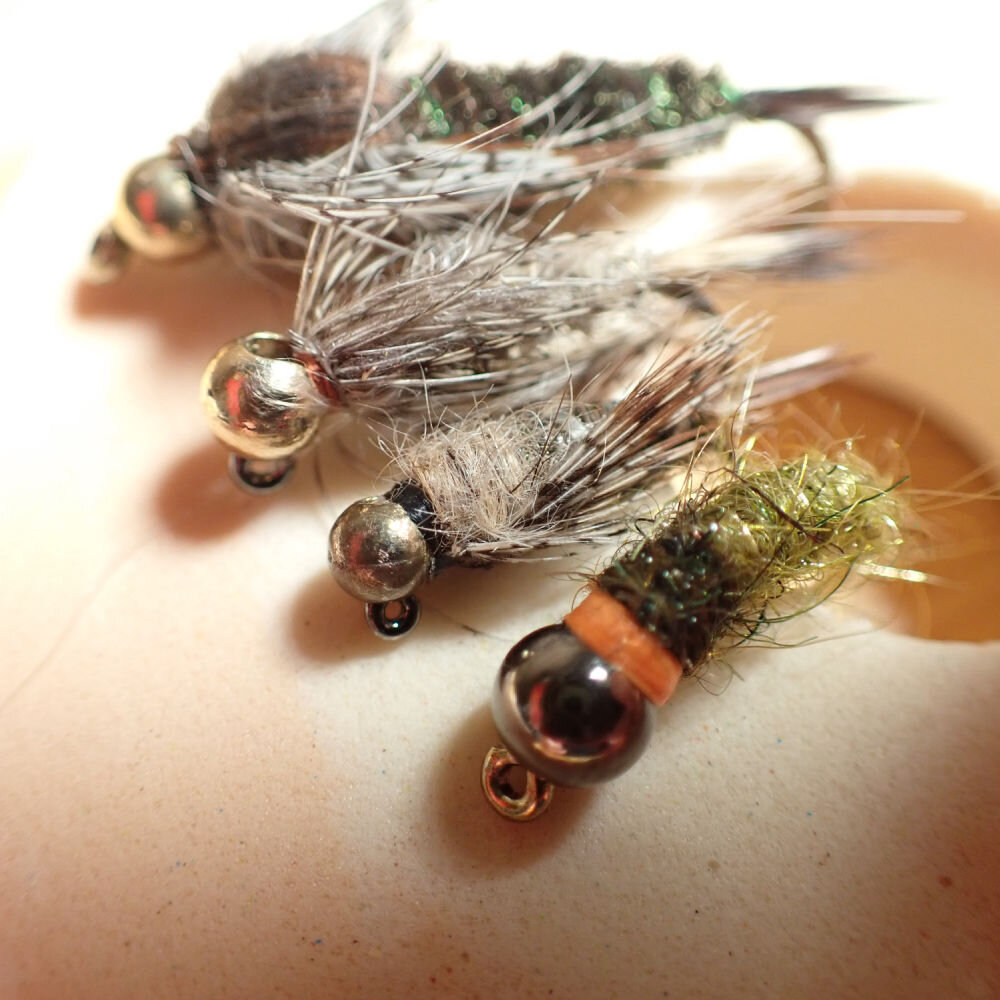
Try Jig Nymphs which are less likely to get snagged.
Try Tungsten weighted flies with slim bodies that cut through the water to get deep quickly. Typical sizes are in the #12 - #14, pending tippet size.
See our fly guide for nymph suggestions. We are found of classic suggestive fly patterns in jig nymph style (pheasant tail, gold-ribbed hares ear, prince nymph) as well as flies that feature some attractor elements such as orange & green colors.
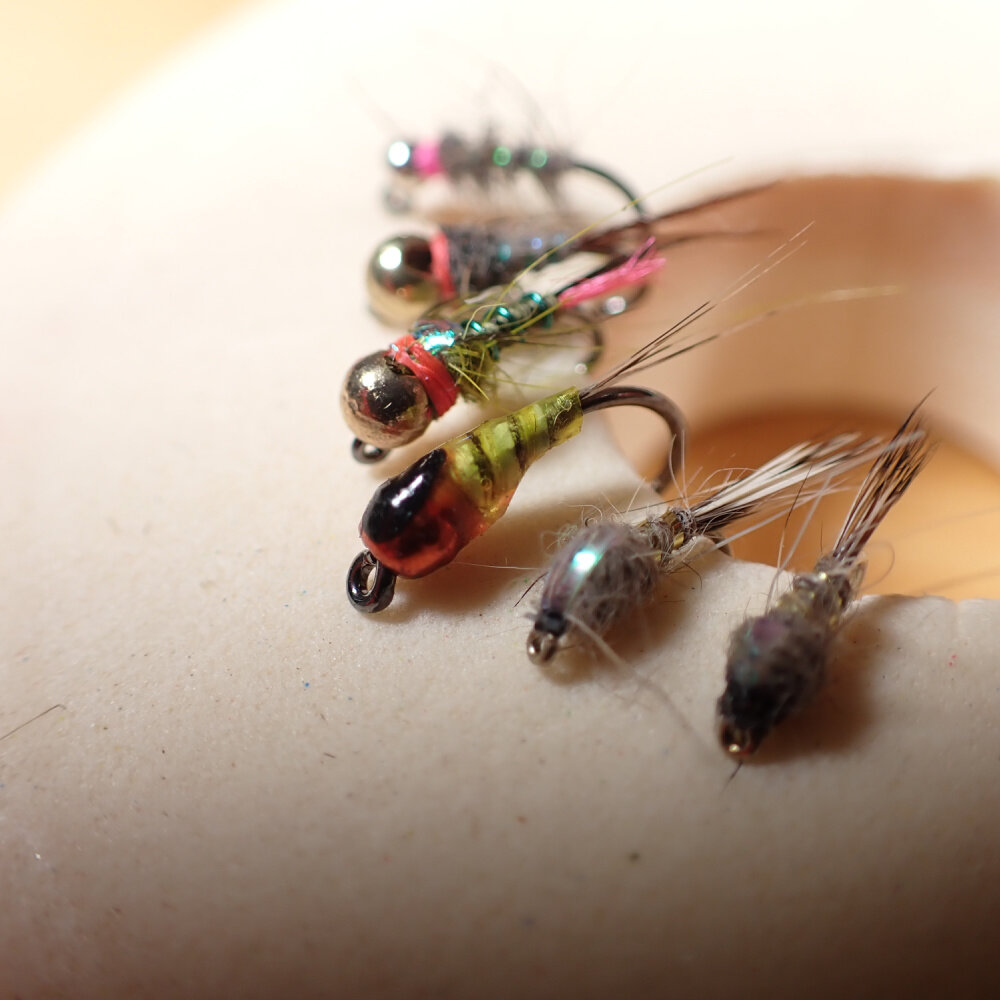
The Top Fly
The top fly is usually much smaller than the bottom fly. Typically, this fly is a size 16-20 and can be weighted or unweighted.
Even more so than the bottom fly, we like to use attractor flies with colors, flash and sparkle.
See fly guide for suggestions.
Nymph Rig Illustrations
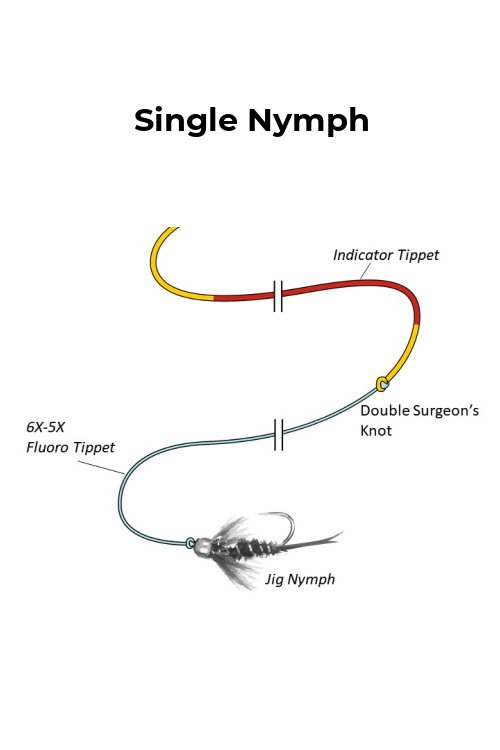
Single Nymph. This is how Keiryu nymphing is done in Japan. There are many advantages to single nymphing: It is simple, there are no tangles, less time is spent rigging and more time fishing (for most us at least). Most importantly, a single nymph is completely free to move about and as a result it drifts more naturally. A few other things to keep in mind:
The Keiryu rod makes it very easy to fish at a higher column by simply raising your rod. Moreover, the impact of a single nymph paired with the light keiryu line is minimal. This means you can cast more frequently without spooking the fish and experiment at different depths.
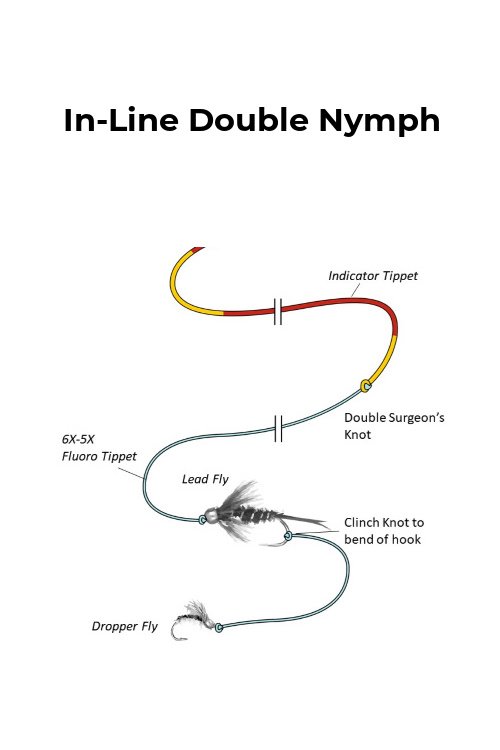
In-Line Double Rig. This is perhaps the most common double nymph set up. It is easy to do with just a bit of practice. Best of all, it is not tangle prone and it allows the angler to fish both the bottom and middle water column. On the downside the natural drift of the nymphs are sacrificed, especially for the top nymph that is anchored to two lines (with that said, in this set up it is the bottom, dropper fly that typically gets the bite).
The illustration below shows a BH Prince Nymph lead fly with a Zebra Midge dropper fly that has worked extremely well. In other situations, placing a stonefly at the bottom and a soft hackle wet fly at the top (mimicking an emerging mayfly) is a great selection for this set up.
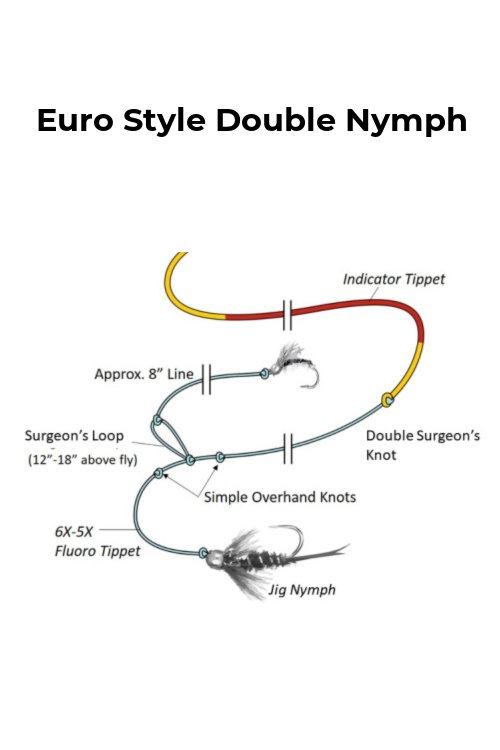
Euro Style Double Rig. This rig is inspired by and builds off the Czech and Polish nymphing set up. Fished in fast water, with a tight line, and a natural drift, this is an extremely effective set-up. A heavy tungsten nymph is the point (bottom) fly.
A favorite set up of mine that has been very effective is pairing an Umpqua “20 incher” jig nymph at bottom (size 10-12) with a smaller (size 16) colorful nymph at the top such as a Bishop’s Dynamite or Czech-mate Sparkle. Below are two options to attach the top fly:
Surgeons Tag Dropper. Create a 7-9” dropper using a quadruple surgeon’s knot (4 overhand loop knot). Doing this results in a tag line that is perpendicular to the tippet line. Create this dropper by joining your dropper to the tippet line (where you want the dropper located) and execute a quadruple surgeon’s knot. Cut the small tag and attached the fly on the long tag.
Surgeon’s Loop Knot Dropper (shown below). Create a 7-9” dropper using a regular surgeon’s loop at one end. Place the loop under the main tippet line where you want the dropper to go and pass the line through it and then cinch the knot tightly closed. Note - because this is a loop knot, it will slide on the tippet line, therefore add a simple overhand knot beneath and above the dropper to prevent it from sliding up or down. Like the surgeon’s tag, this dropper protrudes perpendicular to the line, however, it is more rigid, doing a better job of keeping the dropper line away from the main tippet line and reducing tangles.